
If you’ve already read our guide on What Is Whisper?, the next step is getting it running on your own computer.
The good news is that you don’t need an OpenAI API key, a monthly subscription, or a cloud service to use Whisper. One of the biggest reasons Whisper has become popular in local AI communities is that it can run entirely on your own hardware.
In this guide, we’ll focus on the easiest installation path for most beginners: Buzz, a free desktop application that uses Whisper locally and provides a simple graphical interface.
By the end of this tutorial, you’ll be able to transcribe audio and video files directly on your computer without paying usage fees or sending recordings to a third-party service.
Quick Answer: When Should You Use Local Whisper?
Use local Whisper when you want private, repeatable transcription without sending recordings to a cloud service. It is especially useful for voice notes, interviews, lectures, podcast drafts, meeting recordings, and turning spoken ideas into text you can clean up later.
| Use case | Why Whisper helps |
|---|---|
| Voice notes | Turns rough spoken ideas into text you can organize. |
| Meetings or lectures | Creates a transcript you can summarize or review. |
| Podcast and video drafts | Gives you source text for clips, posts, notes, or articles. |
| Local AI workflows | Creates clean text that can feed into markdown notes, RAG systems, or n8n automations. |
Why Use Buzz Instead of Installing Whisper Manually?
Many Whisper tutorials immediately jump into Python, virtual environments, package managers, FFmpeg dependencies, and terminal commands. While those methods are powerful, they can be intimidating if your goal is simply to transcribe a meeting recording, podcast episode, lecture, or voice memo.
Buzz removes much of that complexity.
Under the hood, you’re still using Whisper. The difference is that Buzz provides a desktop application that handles much of the setup for you. Instead of troubleshooting command-line errors, you can focus on converting audio into usable text.
Buzz is also completely local. Your recordings stay on your machine, there are no API fees, and you don’t need an OpenAI account to begin transcribing files.
For most beginners, this is the fastest way to start using Whisper.
What You’ll Need Before Installing
Before getting started, make sure you have a computer running macOS, Windows, or Linux and a stable internet connection for the initial download.
You’ll also want a sample audio file available for testing later in the guide. A short voice memo, meeting recording, interview, lecture recording, or podcast clip works perfectly.
Beyond that, there isn’t much required. You do not need programming experience, cloud credits, an OpenAI account, or a paid subscription.
Download Buzz
Download Buzz from the official project page:
You can also view the source code and release information on GitHub:
As with any software installation, always download files from the official project sources.
Installing Buzz on macOS
Mac users have one of the simplest installation experiences.
Start by downloading the appropriate version for your system. If you’re using an Apple Silicon Mac such as an M1, M2, M3, or M4 machine, choose the ARM64 release. If you’re running an older Intel-based Mac, download the Intel or x64 version.
After the download finishes, open the DMG file and drag Buzz into your Applications folder just like any other macOS application.
Once installed, launch Buzz from Applications. The first startup may take a few moments while the application prepares its environment and downloads any required components.
After Buzz opens successfully, you’ll be ready to select a Whisper model and begin your first transcription.
Installing Buzz on Windows
Installing Buzz on Windows is also straightforward and only takes a few minutes.
Begin by downloading the latest Windows release from the official Buzz download page. The download is typically provided as a ZIP file.
Once the download finishes, extract the ZIP file to a location of your choice. Many users create a dedicated folder inside Documents or Downloads to keep things organized.
After extraction, launch the Buzz executable.
Depending on your Windows security settings, you may see a SmartScreen warning. If you downloaded Buzz from the official project page, select More Info and then choose Run Anyway.
Buzz should then launch and begin preparing the local environment needed to run Whisper.
Installing Buzz on Linux
Linux users should download the appropriate release from the official Buzz project page and follow the installation instructions provided for their distribution.
Because Linux environments vary significantly between distributions, the exact installation process may differ depending on your system. Some distributions may provide additional installation options or package formats that simplify setup.
Regardless of the installation method, the overall experience remains the same. Install Buzz, launch the application, choose a Whisper model, and begin transcribing audio locally.
Linux users should always refer to the official Buzz project documentation for the most up-to-date installation instructions and supported package formats.
Choosing Your First Whisper Model
The first time you launch Buzz, you’ll be asked to choose a Whisper model.
This decision affects both transcription speed and accuracy.
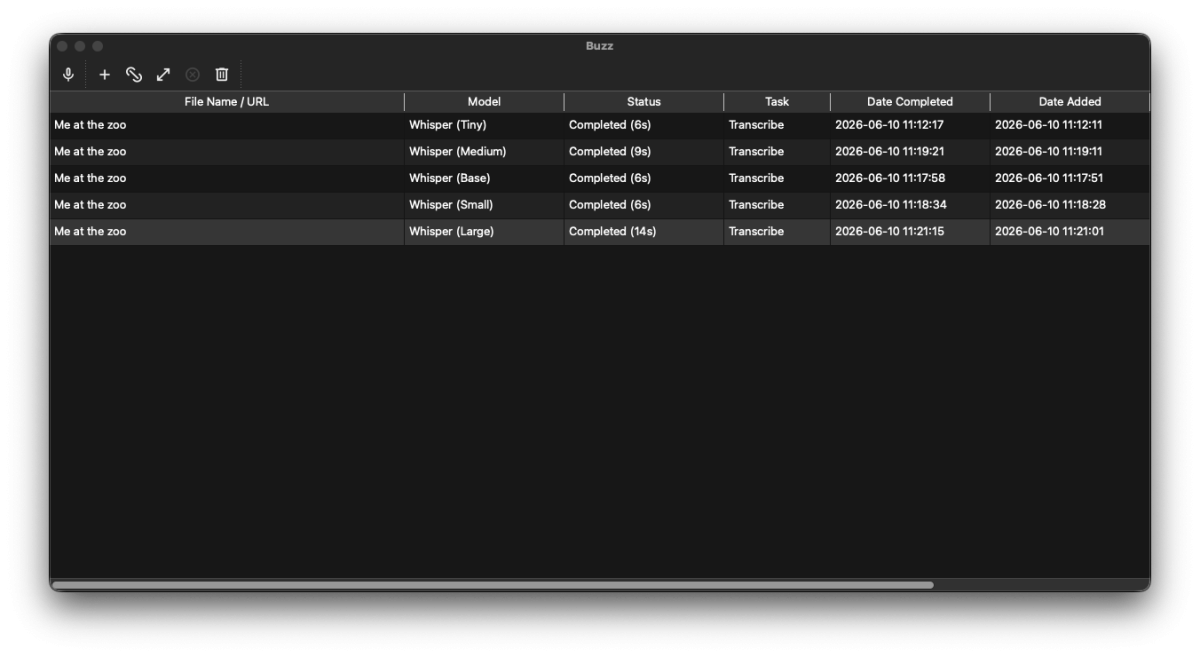
To better understand the differences, we tested each model using the same short YouTube clip as a sample and compared both processing time and transcription quality.
The Tiny model completed the transcription in roughly six seconds, but it incorrectly transcribed “long trunks” as “long prompts.”
The Base model completed in a similar amount of time but still produced an incorrect result, hearing “long hunts” instead of “long trunks.”
The Small model was the first version to produce a highly accurate transcript while maintaining fast processing speeds. In our testing, it completed the transcription in approximately six seconds and provided the best balance between speed and accuracy.
The Medium model required slightly more processing time at around nine seconds but produced excellent results. For users who prioritize accuracy over speed, this is often the best choice.
The Large model delivered excellent transcription quality as well, but processing time increased to approximately fourteen seconds. While powerful, it will be unnecessary for many everyday transcription tasks.
Based on our testing, most beginners should start with the Small model.
If transcription quality becomes more important than speed, move up to Medium.
Tiny is useful for quick drafts, while Large is best reserved for situations where maximum accuracy is worth the additional processing time.
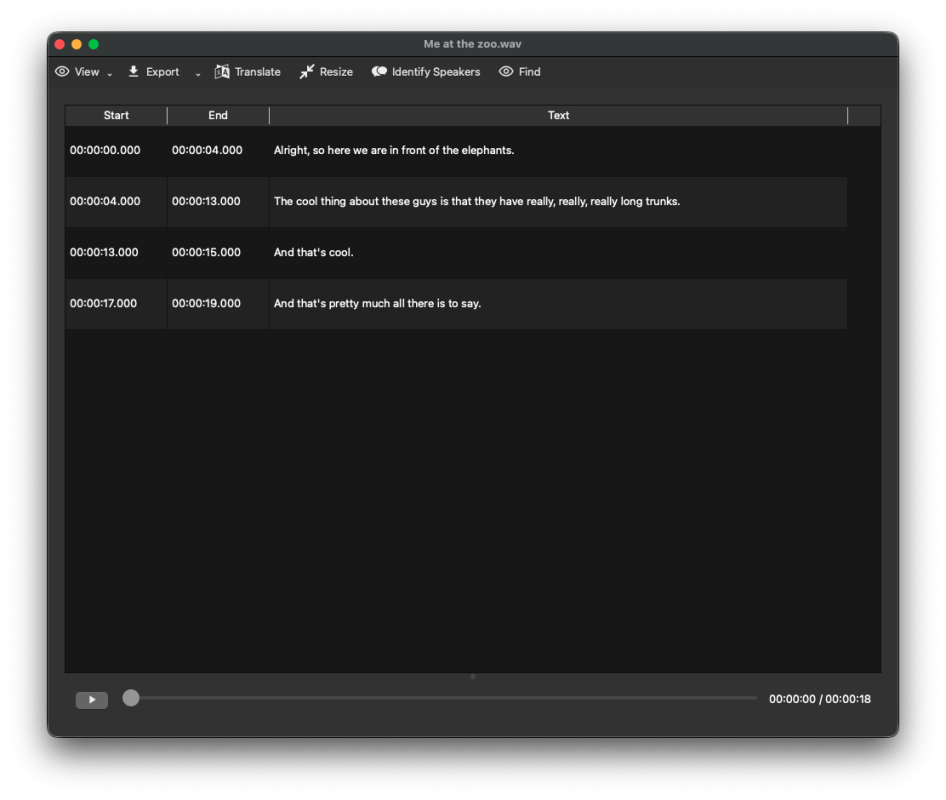
The output from the large model is shown below:
Your First Transcription
Once Buzz is installed and you’ve selected a model, you’re ready to create your first transcript.
Import an audio file, video file, or supported URL into Buzz.
After the file loads, start the transcription process and allow Whisper to analyze the recording.
Depending on the length of the recording and the model you’ve selected, processing may take anywhere from a few seconds to several minutes.
When the transcription finishes, Buzz allows you to export the results in several formats including plain text, subtitle files, and caption formats.
Exporting and Using Your Transcript
Once Whisper finishes processing your recording, the transcript becomes available inside Buzz.
At this point, the recording has been converted from spoken audio into searchable text. For many users, this is where the real value begins.
A transcript is much easier to work with than an audio file. You can search it, summarize it, store it in a knowledge base, or use other AI tools to extract insights and action items.
Buzz allows transcripts to be exported in several formats depending on your needs.
Plain text files are useful for note-taking systems and knowledge bases. Subtitle formats such as SRT and VTT are useful when creating captions for videos or podcasts.
For most beginners, exporting a simple text file is the easiest place to start.
Common Problems and Simple Fixes
Most Buzz installations work without major issues, but a few common problems appear frequently.
If Buzz seems slow during transcription, the most common cause is selecting a model that is too large for your hardware. Switching to the Small model often provides a much better balance between speed and accuracy.
If transcription accuracy seems poor, try using a larger model such as Medium. Clear audio quality also makes a significant difference. Even the best Whisper models can struggle with noisy recordings, multiple people speaking at once, or poor microphone quality.
Occasionally users believe Whisper is malfunctioning when the real issue is the recording itself. Better audio almost always leads to better transcripts.
If Buzz fails to launch, make sure you’re using the correct version for your operating system and processor architecture. Apple Silicon users should use ARM64 builds, while Intel systems should use x64 versions.
Advanced Option: Installing Whisper Directly
Buzz is the easiest option for most users, but some people prefer installing Whisper directly through Python.
This approach provides more flexibility and greater control over workflows, automation systems, and custom integrations. It is especially popular among developers and people building larger AI workflows.
Direct installation typically involves Python, FFmpeg, and the Whisper package itself. While the setup process requires more effort than Buzz, it can be useful when integrating Whisper into automation tools, local AI systems, or custom applications.
We’ll cover the command-line installation process in a separate guide focused specifically on advanced Whisper workflows.
What’s Next?
Installing Whisper is only the beginning.
Once you can generate transcripts locally, those transcripts can become part of larger AI workflows. Meeting recordings can be summarized. Voice notes can be converted into project documentation. Interviews can become searchable research material.
Many local AI enthusiasts combine Whisper with tools like Ollama, AnythingLLM, and RAG systems to create complete knowledge management workflows.
For example, a recorded meeting can be transcribed with Whisper, summarized by a language model, and stored inside a knowledge base for future retrieval.
That ability to transform spoken information into reusable knowledge is one of the biggest reasons Whisper has become such an important tool in local AI ecosystems.
Frequently Asked Questions
Is Whisper good for meeting transcription?
Whisper can be useful for meeting transcription, especially when you want a local transcript that you can summarize, clean up, or store in a knowledge base later. Audio quality still matters, so use a clear recording whenever possible.
Can Whisper transcripts be used with local AI tools?
Yes. Whisper transcripts are a practical source for local AI workflows. You can clean them up, save them as markdown, add them to AnythingLLM, or feed them into an n8n workflow for summaries and reusable notes.
Do I need an OpenAI API key to use Whisper?
No. Both Buzz and local Whisper installations can run entirely on your own machine without requiring an API key.
Is Whisper free to use?
Yes. Local Whisper installations and Buzz can be used without subscription fees or usage-based costs.
Which Whisper model should beginners use?
Most users should start with the Small model. It provides a strong balance between speed and accuracy. Medium is a good upgrade when transcription quality becomes more important.
Can Whisper run completely offline?
Yes. Once the required files and models have been downloaded, Whisper can process audio locally without sending recordings to cloud services.
If Whisper is your first local tool, the Local AI for Beginners guide will help you see how speech transcription fits into the larger local AI stack.
Final Thoughts
Whisper is one of the easiest ways to start building practical local AI workflows because it solves a simple but important problem: converting audio into usable text.
Using Buzz makes the process accessible even if you’ve never installed AI software before. Within a few minutes, you can go from a recorded conversation to a searchable transcript running entirely on your own machine.
Once you’ve completed your first transcription, you’ll have a much better understanding of how speech-to-text tools fit into larger AI systems and knowledge management workflows.
Stay sharp,
Michael
Creator of GetPrompting.com
Free AI Workflow Starter Kit
Turn what you learned into something useful.
Get the workflow canvas, assistant planner, reusable prompt templates, and first n8n walkthrough, plus practical guides as GetPrompting grows.