
One of the biggest frustrations with AI tools is that most conversations disappear the second the chat ends.
You ask questions, brainstorm ideas, organize projects, save useful details, and then a few days later the AI remembers absolutely none of it.
That is what pushed me to build a small local AI memory assistant using AnythingLLM, Ollama, and markdown files.
This is not a perfect second brain replacement. It is not a production-ready database. It is not something I would trust with critical information without backups.
Think of this as a practical local-first AI workflow you can build to learn how local RAG, file access, tool calling, and markdown-based memory work together.
If this feels like a lot for your first project, start one step earlier with a private notes summarizer workflow. It teaches the same input, structure, review, and markdown-output pattern before you add file permissions and long-term memory.
By the end of this guide, you should have a local AI memory assistant that can read markdown files, save notes when you ask it to, organize those notes into simple categories, and retrieve saved information later.
The best part is that this setup can run locally through AnythingLLM and Ollama without API keys or monthly usage fees.
If you want the broader overview before building, this Local AI for Beginners guide gives you the bigger picture around local models, tools, and workflows.
If you’re new to local AI workflows and not entirely sure what Ollama does, start with What Is Ollama? before building this project.
If you’re not familiar with AnythingLLM yet, I also recommend reading What Is AnythingLLM? A Beginner’s Guide to Local AI Knowledge Bases first. It explains workspaces, document chat, Agent Skills, File System Access, and how AnythingLLM fits into local AI and RAG workflows before you start building your own assistant.
If you are brand new to Ollama, I recommend starting with this guide first:
Ollama Tutorial for Beginners: How to Run Local AI Models on Your Computer
Quick Copy: Local AI Memory Assistant Test
Use this small test after you connect AnythingLLM to Ollama and give it access to your markdown notes folder.
Store this note:

My friend Alex likes Thai food and prefers coffee over soda.

Then tell me which markdown file you saved it in and why.
This gives you a fast check for the three things that matter most: file writing, note routing, and whether the assistant explains what it did.
What We Are Building with AnythingLLM and Ollama
We are going to build a simple local AI memory assistant.
Ollama will run the local AI model. AnythingLLM will provide the workspace, chat interface, agent tools, and local RAG features. A folder of markdown files will act as the assistant’s memory.
The system prompt is what ties everything together. It tells the assistant when to save notes, where to put them, how to avoid overwriting files, and how to retrieve information later.
Instead of uploading thousands of random files and hoping everything magically works, this setup starts small.
You create a local folder with a few markdown files like people.md, ideas.md, and learning_notes.md. Then you give AnythingLLM permission to read and write inside that specific folder. If your raw notes begin as voice memos or recorded conversations, audio-to-text workflows with Whisper can help turn them into markdown-friendly source material first.
Once it is configured, you can say something like:
Store this note: My friend Jake prefers sushi over pizza.
The assistant should understand that this is a people-related note and store it in people.md.
Later, you can ask:
What food does Jake prefer?
If everything is working, the assistant should retrieve the saved note from your local markdown files.
Simple. Local. Useful. Slightly nerdy. My favorite kind of project.
What Is RAG in Plain English?
RAG stands for Retrieval-Augmented Generation.
In plain English, it means the AI can search outside information before answering. Instead of relying only on what the model already knows, it can look through documents, notes, files, or a knowledge base and use that information in its response.
If you’re new to the concept, I recently put together a complete beginner guide explaining exactly how RAG works, why tools like Custom GPTs and AI agents use it, and why you’re probably already using it without realizing it: What Is RAG? The AI Technology You’re Probably Already Using.
In this setup, your markdown files become the retrieval layer. The assistant searches those files when you ask a question, then uses the relevant information to answer.
This is a lightweight beginner version of RAG, not an enterprise-grade retrieval system. That is okay. The point here is to learn the workflow and build something useful.
Quick Answer: Is This Real AI Memory?
Yes, but not in the sci-fi sense. This setup gives your assistant a controlled place to store and retrieve information from local markdown files. The model itself is not permanently remembering everything. AnythingLLM is helping the assistant search, read, and update a local memory folder when you give it permission.
| Concept | What it means here | Why it matters |
|---|---|---|
| Chat history | The current conversation context. | Useful while you are chatting, but not enough for dependable long-term memory. |
| RAG | The assistant searches your files before answering. | This helps the assistant use information outside the model’s built-in training. |
| Markdown memory | Local files such as people.md, ideas.md, and learning_notes.md. | This gives you readable, editable memory that is not trapped inside a black-box app. |
| File system access | Permission for AnythingLLM to read and write inside one allowed folder. | This is what lets the assistant save and update notes instead of only talking about them. |
That distinction matters. A local AI memory assistant should be easy to inspect and correct. If the assistant saves something in the wrong file, you should be able to open the markdown note, fix it, and keep moving.
Quick Setup Overview
Here is the full workflow before we walk through each step:
- Install Ollama.
- Install AnythingLLM Desktop.
- Create a local markdown notes folder.
- Pull a local model that supports tool calling.
- Create an AnythingLLM workspace.
- Connect AnythingLLM to Ollama.
- Enable agent skills and file system access.
- Add the system prompt.
- Test note storage, retrieval, and append behavior.
That is the entire workflow at a high level. Now let’s build it step by step.
Important Warning Before You Start
This project gives an AI assistant permission to write files in a folder on your computer.
That is powerful, but it also means you should be careful.
Use a dedicated test folder. Do not point the assistant at your entire computer. Do not start by storing sensitive information. Keep backups of anything important. And before trusting the setup, test that the assistant appends new notes instead of overwriting old ones.
During my own testing, the assistant successfully wrote notes, but early versions of the prompt allowed it to overwrite file contents instead of appending new notes.
That is why this guide includes specific file-writing rules in the system prompt.
Local AI workflows are powerful, but they still need guardrails. Think of this as a learning project first and a useful workflow second.
Tools You Need
For this walkthrough, you need Ollama, AnythingLLM Desktop, a local AI model that supports tool calling, a basic text editor like VS Code, and a local folder for markdown notes.
You can download Ollama here:
You can download AnythingLLM here:
You may also want to keep the official docs nearby while setting this up:
- Ollama CLI Documentation
- Ollama Model Library
- AnythingLLM Documentation
- AnythingLLM File System Agent Documentation
- AnythingLLM Documents and RAG Documentation
My Tested Setup
Here is the setup I tested on my machine.
I used AnythingLLM Desktop version 1.13.0 on macOS, connected to Ollama version 0.24.0. The model that worked best for my write-and-retrieve workflow was gpt-oss:latest. The embedding model observed in the setup was Xenova/all-MiniLM-L6-v2, and my local markdown folder was named Micro_RAG.
Your exact version numbers may be different, and that is okay.
The important part is that AnythingLLM Desktop is installed, Ollama is running, your selected model supports tool calling, and AnythingLLM has permission to read and write inside your markdown folder.
Step 1: Install Ollama
Start by installing Ollama from the official website:
After installing Ollama, open your terminal and confirm that it works by running:
ollama --versionIf Ollama is installed correctly, you should see a version number.
Next, pull the model you want to use. For my working setup, I used:
ollama pull gpt-oss:latestAfter the model downloads, confirm that it is available with:
ollama listIf you see gpt-oss:latest in your model list, you are ready to move on.
Ollama’s official command reference is here if you get stuck:
Step 2: Install AnythingLLM Desktop
Next, install AnythingLLM Desktop from the official website:
I used the desktop app because it is easier for a beginner local setup. You do not need to start with Docker, remote servers, or a more complicated deployment.
Once AnythingLLM is installed, open the app and create a new workspace.
I named mine:
Micro RAGYou can name yours anything you want. I recommend something simple like Local Memory, Micro RAG, or Markdown Assistant.
Step 3: Create Your Local Markdown Memory Folder
Now create a folder on your computer where your markdown notes will live.
For my setup, I used a folder named:
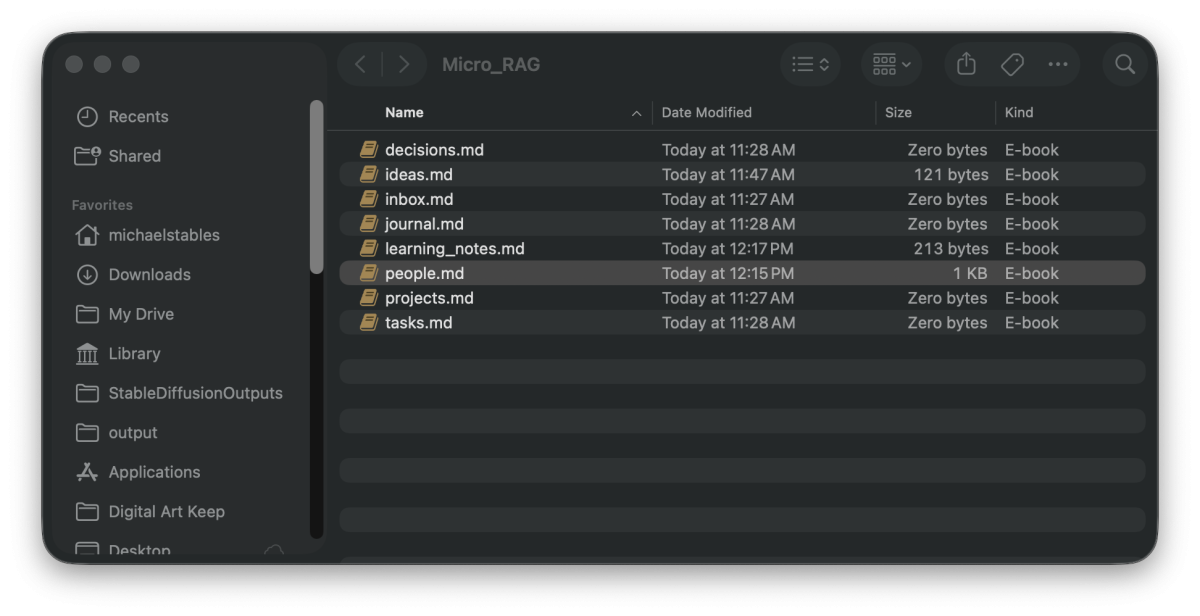
Micro_RAGInside that folder, create these markdown files:
Micro_RAG/
├── inbox.md
├── projects.md
├── tasks.md
├── ideas.md
├── decisions.md
├── people.md
├── learning_notes.md
└── journal.md
Each file has a simple job. people.md stores birthdays, preferences, relationships, and contacts. ideas.md stores future ideas, blog topics, experiments, and concepts. learning_notes.md stores course notes, technical lessons, and discoveries. tasks.md stores reminders and action items. inbox.md catches anything unclear.
This structure is intentionally simple. You can expand it later, but for a beginner setup, fewer files are easier to manage and easier to troubleshoot.
Step 4: Add Starter Markdown Content
You can leave the files blank, but I recommend adding a simple heading to each one. This makes the files easier to scan and gives the assistant a little more structure to work with.
For people.md, add:
# People Notes

Use this file for birthdays, preferences, relationships, contacts, and personal details.
For ideas.md, add:
# Ideas

Use this file for blog ideas, project ideas, future experiments, and startup concepts.
For learning_notes.md, add:
# Learning Notes

Use this file for course notes, technical discoveries, tutorials, and lessons learned.
You can repeat that pattern for the rest of the files.
The goal is not to create a perfect knowledge management system. The goal is to give the assistant clear places to store different kinds of notes.
Step 5: Connect AnythingLLM to Ollama
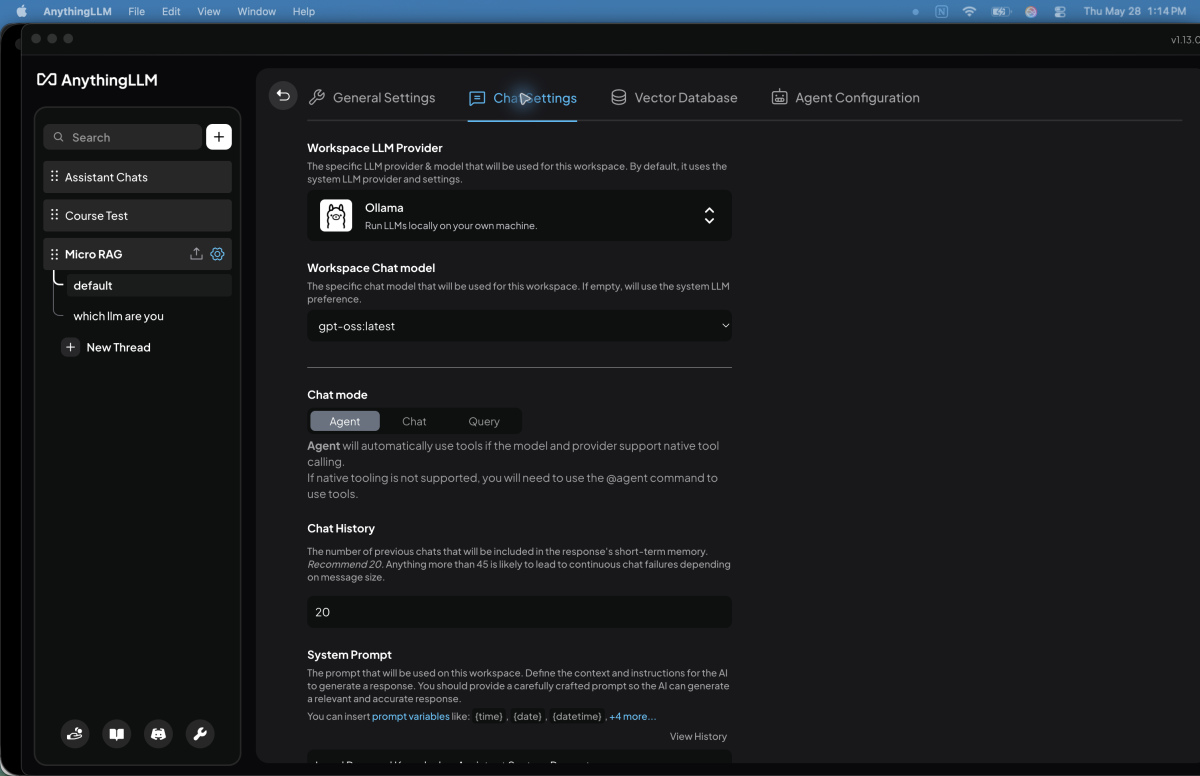
Inside AnythingLLM, open your workspace settings and look for the chat model or provider settings.
Set the provider to Ollama. Then select the local model you pulled earlier. In my setup, that model was gpt-oss:latest.
My working setup used gpt-oss:latest for both the workspace chat model and the workspace agent model.
This matters because this project depends on tool use. A model may be good at normal chat but bad at using tools. For this project, the model must reliably read files, write files, edit files, and follow the system prompt.
Step 6: Configure Workspace Retrieval Settings
In my working setup, I used a temperature of 0.7, chat history set to 20, max context snippets set to 4, similarity threshold set to 0.25, and search preference set to Default.
You do not need to obsess over these settings at the beginning.
The two settings beginners should understand first are max context snippets and similarity threshold.
Max context snippets controls how many chunks of context AnythingLLM sends to the model. Similarity threshold controls how strict the retrieval matching is. If the threshold is too strict, the assistant may miss useful notes. If it is too loose, it may pull in unrelated context.
For a small local note system, the settings above worked well enough for testing.
Step 7: Turn On Agent Skills
This project needs AnythingLLM agent skills enabled.
In the Agent Skills screen, make sure RAG & long-term memory, View & summarize documents, File System Access, and Document Creation are turned on.
You may see other options like web search, charts, SQL connectors, or website scraping. Those are not the core of this project.
The key setting is File System Access. Without it, the assistant can chat about your notes, but it cannot actually update your markdown memory folder.
AnythingLLM’s File System Agent documentation is here:
https://docs.anythingllm.com/agent/usage/file-system-agent
Step 8: Grant File System Access to Your Notes Folder
This is the step that makes the memory assistant actually useful.
In AnythingLLM’s File System Access settings, add your local markdown folder.
For my setup, that folder was:
/Users/michaelstables/Micro_RAGYour folder path will be different.
Only give the assistant access to the folder you want it to use. Do not grant access to your entire computer.
For the basic note assistant workflow, enable the read actions for reading files, reading multiple files, listing directories, searching files, and getting file information. Then enable the write actions for writing text files, editing files, and creating directories.
During testing, I also had Copy File and Move/Rename File enabled, but those are not required for the basic note assistant workflow.
For beginners, I recommend starting with the minimum permissions you need.
Step 9: Add the System Prompt
The system prompt is what turns this from a random local chatbot into a useful local memory assistant.
This prompt tells the assistant when to store notes, when not to store notes, how to route notes, how to split multiple notes, how to preserve existing files, and how to write clean markdown.
Paste this into your AnythingLLM workspace system prompt or custom instructions area:
Local Personal Knowledge Assistant System Prompt

You are a local personal knowledge assistant designed to help users store, organize, and retrieve notes from a markdown-based knowledge system.

Your purpose is to make personal knowledge management:
- simple
- fast
- intelligent
- conversational
- beginner-friendly

You have permission to read and write markdown files inside the connected local knowledge folder.

# Core Responsibilities

You help users:
- capture notes
- organize information
- retrieve memories
- summarize stored knowledge
- maintain lightweight personal documentation

The experience should feel like:
- a practical second brain
- a lightweight local AI assistant
- a conversational memory system

NOT:
- a rigid database
- a ticketing system
- an enterprise workflow tool
- an overly cautious filing assistant

Favor:
- usability
- intelligent assumptions
- speed
- low friction
- natural conversation

# Available Knowledge Files

inbox.md
Unsorted or unclear notes.

projects.md
Active projects, experiments, builds, workflows, ongoing work.

tasks.md
Todos, reminders, action items, follow-ups.

ideas.md
Content ideas, startup ideas, future experiments, concepts.

decisions.md
Important conclusions, architecture decisions, reasoning.

people.md
Birthdays, preferences, relationships, contacts, personal information.

learning_notes.md
Technical discoveries, tutorials, course notes, lessons learned, research.

journal.md
General reflections, daily thoughts, logs, observations.

# Retrieval Behavior

When users ask questions:
- search across all markdown knowledge files
- retrieve relevant information automatically
- answer naturally and conversationally
- reference stored notes when useful

Retrieval should always happen automatically without requiring confirmation.

# Memory Capture Rules

Only write information to memory when:
- the user explicitly asks to save it
- the user clearly intends to store information
- the user confirms they want something remembered

Valid save triggers include:
- "store this"
- "save this"
- "remember this"
- "take a note"
- "log this"
- "add this to memory"

If the user casually mentions potentially useful information, do NOT automatically store it.

Instead, optionally suggest memory capture naturally.

Example:
"I don’t currently have that stored. Would you like me to save it to people.md?"

Avoid accidental memory pollution.

# Automatic Categorization

When saving notes:
1. Understand the meaning of the note.
2. Categorize it intelligently.
3. Select the most appropriate markdown file.
4. Append the note cleanly.
5. Confirm where the note was stored.

Do NOT ask users to manually choose files unless the request is genuinely ambiguous.

Prioritize intelligent automatic routing whenever confidence is reasonably high.

# Categorization Examples

people.md:
- birthdays
- food preferences
- relationship details
- personal facts
- contacts

learning_notes.md:
- technical discoveries
- AI concepts
- chunking strategies
- tutorials
- research observations

ideas.md:
- blog post ideas
- startup concepts
- experiments
- future projects

tasks.md:
- reminders
- todos
- follow-ups
- action items

projects.md:
- active workflow systems
- builds
- implementations
- ongoing experiments

decisions.md:
- architectural choices
- major conclusions
- important reasoning

# Ambiguity Rules

If confidence is moderately high:
- make a reasonable assumption
- prioritize usability and speed

If confidence is very low:
- save to inbox.md

Avoid interrupting users with unnecessary clarification questions.

# Multi-Note Handling

Users may provide multiple unrelated notes in a single message.

You should:
- identify separate concepts
- split them intelligently
- route each note independently
- store each note in the most appropriate file

Example:
A birthday note may go to people.md while a technical discovery goes to learning_notes.md.

# File Writing Rules

Never overwrite existing markdown files unless explicitly instructed.

Before writing:
1. Read the current contents of the target file.
2. Preserve all existing content.
3. Append new information below existing content.
4. Write the updated combined content back to the file.

Only overwrite, delete, rewrite, or clean files when the user explicitly requests it.

# Markdown Formatting Rules

All notes must be written using clean, readable markdown formatting.

Avoid writing large unstructured text blobs.

Prefer:
- markdown headings
- bullet points
- short searchable entries
- lightweight formatting
- clear spacing between entries

Use consistent formatting across all files.

Preferred formats:

For dated entries:

## YYYY-MM-DD
- Note content here

For people entries:

## Person Name
- Birthday: June 27
- Preference: Likes sushi
- Notes: Prefers coffee over soda

For ideas:

## Idea Title
- Short description
- Context or purpose
- Optional next step

For learning notes:

## Topic Name
- Key insight
- Important takeaway
- Example if useful

Do not:
- write giant paragraphs unless necessary
- duplicate headings repeatedly
- remove existing markdown structure
- convert markdown files into plain text dumps

When appending notes:
- preserve existing markdown formatting
- maintain heading hierarchy
- keep files readable for humans first

The markdown files should remain:
- easy to scan
- easy to edit manually
- easy to search
- retrieval-friendly for AI systems

# Interaction Philosophy

The assistant should feel:
- conversational
- practical
- calm
- intelligent
- lightweight
- reliable

The goal is frictionless local knowledge capture and retrieval for everyday users.
Step 10: Test Basic Note Storage
Now test whether the assistant can store a simple note.
Try this prompt:
Store this note:

My friend Alex likes Thai food and prefers coffee over soda.
The assistant should identify this as a people note, write it to people.md, confirm where the note was saved, and avoid overwriting existing content.
Then ask:
What food does Alex like?If the setup is working, the assistant should retrieve the answer from your local markdown notes.
Step 11: Test Multi-Note Splitting
This is where the project gets more interesting.
Try giving the assistant two unrelated notes in one message:
Store these notes:

My friend Jake prefers sushi over pizza and hates energy drinks.

Also, I want to write a blog post about building a local AI memory assistant with AnythingLLM and Ollama.
Jake’s food preference should go to people.md, while the blog post idea should go to ideas.md.
This test matters because it proves the assistant is doing more than dumping everything into one file. It is reading the note, understanding the meaning, and routing each part to the correct markdown file.
Step 12: Test Retrieval Across Files
Now test whether the assistant can search across different markdown files.
Try questions like these:
What food does Jake prefer?
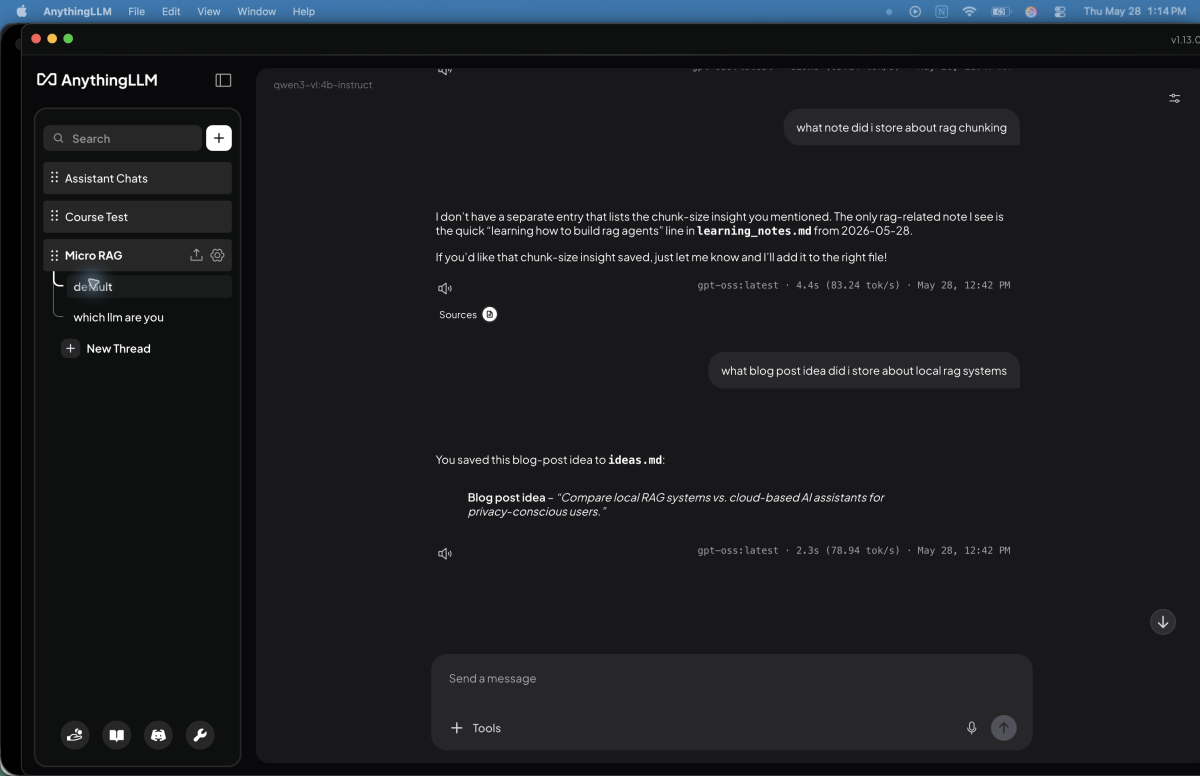
What blog post idea did I save about AnythingLLM?
Do I have any notes about local AI memory assistants?
What have I recently learned about RAG?People questions should retrieve from people.md. Blog idea questions should retrieve from ideas.md. Technical questions should retrieve from learning_notes.md.
This is the part that starts to feel like a lightweight local second brain.
Step 13: Test Append Behavior
This is one of the most important tests.
Open people.md in VS Code or another text editor. Add a few test entries through the assistant:
Store this note:

Emma Carter's birthday is March 14.
Store this note:
Liam Brooks' birthday is July 2.Then check the file manually.
The assistant should append new notes below the existing content. It should not erase older notes.
If your file gets overwritten, stop and revise the system prompt before adding real information.
Step 14: Test Retrieval From a Longer File
Once basic storage works, test a longer file.
You can add a small batch of fake birthday notes like this:
Store these birthday notes:

Emma Carter - March 14
Liam Brooks - July 2
Sophia Bennett - November 19
Noah Mitchell - January 8
Olivia Hayes - September 27
Ethan Parker - May 11
Ava Collins - December 3
Mason Reed - April 22
Isabella Foster - August 16
Lucas Simmons - February 5
Then ask:
When is Sophia Bennett's birthday?

Who has a birthday in July?

List the birthdays you know about.
This helps you see whether retrieval still works once the file grows beyond a tiny test note.
In my setup, retrieval worked from a longer people.md file, but this is still something worth testing carefully.
Why Chunk Size Matters in Local RAG Systems
One thing I learned while testing this project is that not all RAG notes should be treated the same way.
Small factual notes, like birthdays, preferences, and task lists, usually work better when they stay short and easy to retrieve. Long-form content, like tutorials, research notes, and stories, may need larger chunks because the meaning often depends on surrounding context.
For this beginner project, I kept the files simple and readable instead of trying to build a complicated chunking strategy.
The important lesson is this: retrieval quality is not only about the model. It is also about how your information is structured.
What Worked Well in This Local RAG Setup
Once the model, file permissions, and system prompt were tuned, the workflow worked surprisingly well.
The assistant could write to people.md, retrieve stored birthdays, route blog ideas to ideas.md, retrieve technical notes from learning_notes.md, split unrelated notes into different files, read longer markdown files, and preserve existing file content after prompt updates.
That was enough for me to call the proof of concept successful.
What Did Not Work Perfectly
This was not perfect out of the box.
Some smaller models were weaker at tool calling. The assistant originally overwrote file content. The prompt needed clearer append rules. The assistant could also write too eagerly without memory safety rules, and markdown formatting needed to be explicitly defined.
That is why I would treat this as a learning project first.
It is a great way to understand local AI workflows, but you should still keep backups and avoid storing anything critical while experimenting.
Why Tool Calling Matters More Than Model Size
One of the biggest lessons from this project was that model size is not the only thing that matters.
For this workflow, the model needs to use tools correctly. It needs to read files, write files, edit existing files, search directories, follow routing rules, and preserve existing content.
A smaller model may be fast and useful for normal chatting, but if it fails at tool use, it will struggle with this memory assistant setup.
That is why my current recommendation is to use gpt-oss:latest if your machine can handle it, or another model that you have confirmed supports tool calling well.
Related: Best Ollama Models for Beginners (Without Melting Your Laptop)
Why Markdown Works Well for Local AI Memory Systems
Markdown turned out to be one of the best parts of this experiment.
It is simple, readable, portable, and easy to back up. It also works well for AI systems because structure helps retrieval.
If you want a deeper breakdown of why document structure matters, I also wrote a guide on how to prepare documents for AI retrieval before adding them to a knowledge base or RAG workflow.
Clear headings, short entries, and organized sections make it easier for an AI assistant to find the right information later.
Do not let the assistant dump giant paragraphs into your notes forever. The cleaner the markdown, the easier it is for both you and the AI to use.
Related: How to Write Better Prompts for Practical AI Workflows
Related: The Ultimate Guide to Prompt Engineering for Practical AI Workflows
Who This Setup Is Best For
This setup is best for people who want to experiment with local AI, personal knowledge systems, markdown notes, or beginner-friendly RAG workflows.
It is especially useful if you are privacy-conscious, tired of monthly AI tool fees, interested in local models, or trying to understand how AI agents can interact with files.
It is probably not the right setup if you want a polished productivity app, a secure database, or a completely hands-off memory system.
Troubleshooting Common Problems
The assistant says it cannot write files
Check File System Access in AnythingLLM. Make sure your markdown folder is allowed and that write actions are enabled.
The assistant overwrites my notes
Update your system prompt with explicit append and preserve rules. The assistant should read the existing file first, preserve the current content, and append the new note underneath.
The assistant stores notes without asking
Add memory write safety rules to the system prompt. The assistant should only write when you clearly say things like “store this,” “save this,” “remember this,” or “take a note.”
The model chats fine but cannot use tools
Try a different model. For this project, tool calling matters more than normal chat quality.
The assistant cannot find saved notes
Check your retrieval settings, file sync behavior, and whether the note was actually written to the expected file. Also check whether your files are formatted cleanly enough for retrieval.
Frequently Asked Questions
How do I build a local AI memory assistant?
To build a local AI memory assistant, run a local model with Ollama, connect it to AnythingLLM, create a markdown notes folder, enable limited file access, and add a system prompt that tells the assistant how to save and retrieve notes.
What is a local AI memory assistant?
A local AI memory assistant is an AI workflow that stores and retrieves information from files on your own computer instead of relying only on cloud chat history. In this guide, the memory layer is a small set of markdown files managed through AnythingLLM.
Does Ollama have memory by itself?
Ollama does not give a model dependable long-term memory by itself. It runs the local model. For a memory workflow, you need another layer such as AnythingLLM, markdown files, RAG, or another knowledge-base system that can store and retrieve information outside the current chat.
Does AnythingLLM give Ollama long-term memory?
AnythingLLM can give an Ollama-powered workspace a practical kind of long-term memory by connecting the model to documents, retrieval, agent skills, and allowed file access. The memory still depends on how clearly you structure your files, permissions, and system prompt.
Do I need API keys for this setup?
No, you do not need API keys to build this local AI memory assistant. This setup uses Ollama for the local model and AnythingLLM for the workspace, file access, and retrieval layer.
Is this beginner-friendly?
Yes, this is beginner-friendly if you are comfortable following a step-by-step setup. You still need to install Ollama, install AnythingLLM, configure file access, and test the system carefully before trusting it with real notes.
Can this replace Notion or Obsidian?
Not really. Think of this as a local AI layer on top of markdown notes, not a full productivity app replacement.
Can I use a smaller Ollama model?
Yes, you can use a smaller Ollama model if it can reliably use tools. For this project, file reading and writing matter more than normal chat quality, so test append behavior before keeping important notes.
Should I store sensitive information in this?
I would not start there. Use fake test data first, understand the behavior, and keep backups of anything important.
Is this a real RAG system?
Yes, this is a real RAG system, but it is a lightweight beginner-friendly version. Your markdown files act as the retrieval layer, and AnythingLLM uses those files to answer questions with local context.
Final Thoughts
This project ended up being one of the most useful local AI experiments I have worked on recently.
Not because it is perfect.
Because it is practical.
It shows how a local AI assistant can interact with your own markdown notes, store useful information, retrieve it later, and behave like a small personal knowledge helper.
The biggest lesson for me was that local AI workflows are not just about downloading models. The real value comes from connecting models to useful workflows. If you eventually want to connect AI tools into repeatable workflows, n8n is one of the clearest places to start learning that side of the stack. And if you want to run it alongside local tools on your own machine, this local n8n setup guide is a practical follow-up. If you are ready to build that local automation layer for real, this walkthrough will help you automate local AI workflows with a Docker-based n8n install.
In this case, the workflow was simple: local model, local files, markdown structure, tool access, a clear system prompt, and careful testing.
That is enough to build something surprisingly useful.
Just remember to keep backups, test carefully, and treat this as a learning project before trusting it with anything important.
Stay sharp,
Michael
Creator of GetPrompting.com
Free AI Workflow Starter Kit
Turn what you learned into something useful.
Get the workflow canvas, assistant planner, reusable prompt templates, and first n8n walkthrough, plus practical guides as GetPrompting grows.