Quick Copy
Starter n8n Workflow Map
Use this simple map when you want to plan the nodes before building your first workflow in n8n.
Manual Trigger
-> Set: add your test input
-> HTTP Request: call the outside service
-> IF: check whether the response is usable
-> Email/Slack: send the result
-> Log: save what happened for debugging
Installing n8n is a great first step, but an empty workflow canvas does not automate much by itself.
At some point, you need to move from “I got the tool running” to “I actually built something useful with it.”
That is what this walkthrough is for.
In this guide, we are going to build a simple n8n workflow that sends a prompt to a local Ollama model, cleans up the AI response, and saves the result into Google Sheets.
By the end, you will click one button in n8n and watch a new AI-generated row appear in Google Sheets.
This is not a giant AI agent system or a complicated production automation. It is a small, practical workflow that teaches one of the most important patterns in AI automation:
Input → AI Generation → Clean Data → Store Result
Once you understand that pattern, a lot of other workflows start to make more sense. If you want the broader beginner version before jumping into n8n, start with this guide to build your first AI workflow.
If you have not installed n8n yet, start with this setup guide first:
Install n8n With Docker: Beginner Step-by-Step Setup Guide
If you want the broader context before building, read What Is n8n? and the n8n setup guide as well.
What We Are Building
For this tutorial, we are building a local AI idea generator that saves its output into a spreadsheet.
The workflow will:
- Start manually when we click the test button
- Create a prompt inside n8n
- Send that prompt to Ollama
- Generate a structured AI response
- Clean the response into usable fields
- Save the final result into Google Sheets
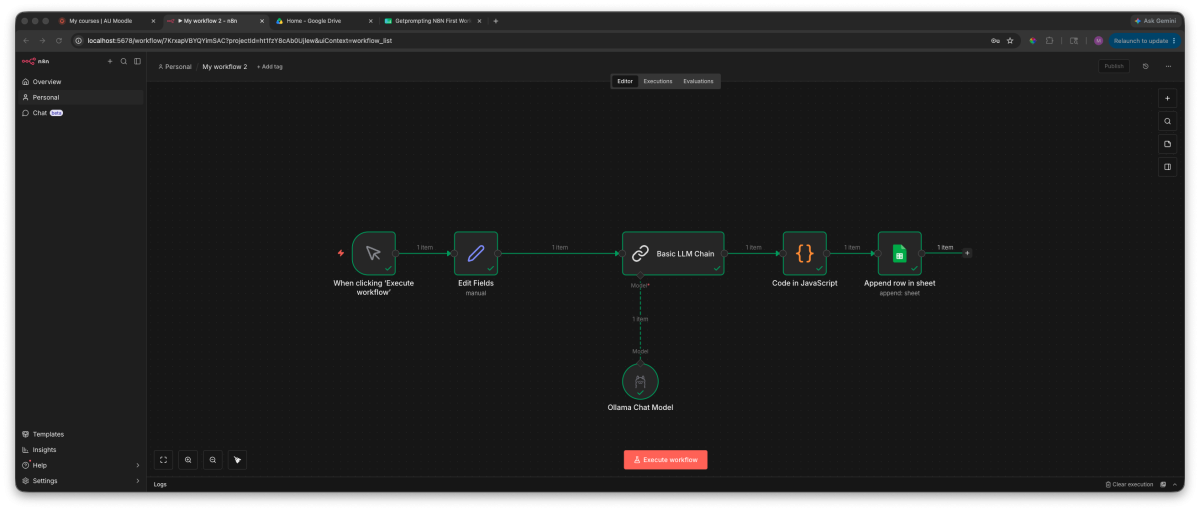
The finished workflow looks like this:
Manual Start
      ↓
Create AI Prompt
      ↓
Generate Response With Ollama
      ↓
Format AI Output
      ↓
Save Idea To Google Sheets
This may look small, but it teaches the core structure behind many useful AI workflows.
If you plan to share or reuse your version later, pause after the first successful run and document the n8n workflow while the setup details are still fresh.
If you want the broader model behind that pattern, this AI workflows guide maps out how prompts, context, models, and automation fit together. If you want a second n8n example with a more practical planning output, try this Daily Action Brief Builder workflow next.
When you are ready to compare more examples, the n8n workflow library gives you free JSON exports for notes, research, SOPs, prompts, email drafts, and content workflows.
A lot of practical automations are just variations of this same idea. For example, an audio workflow might use Whisper to transcribe a recording, send the text to an AI model, clean the response, and save the result somewhere useful.
- Get some input
- Send it somewhere useful
- Clean or shape the result
- Store it, send it, or use it in the next step
What You Need Before Starting
Before building this workflow, you will need:
- n8n running locally
- Ollama installed on your computer
- At least one Ollama model pulled and ready to use
- A Google account
- A blank Google Sheet
If you still need to set up Ollama, I have a beginner guide here:
Ollama Tutorial for Beginners: Run AI Locally on Your Computer
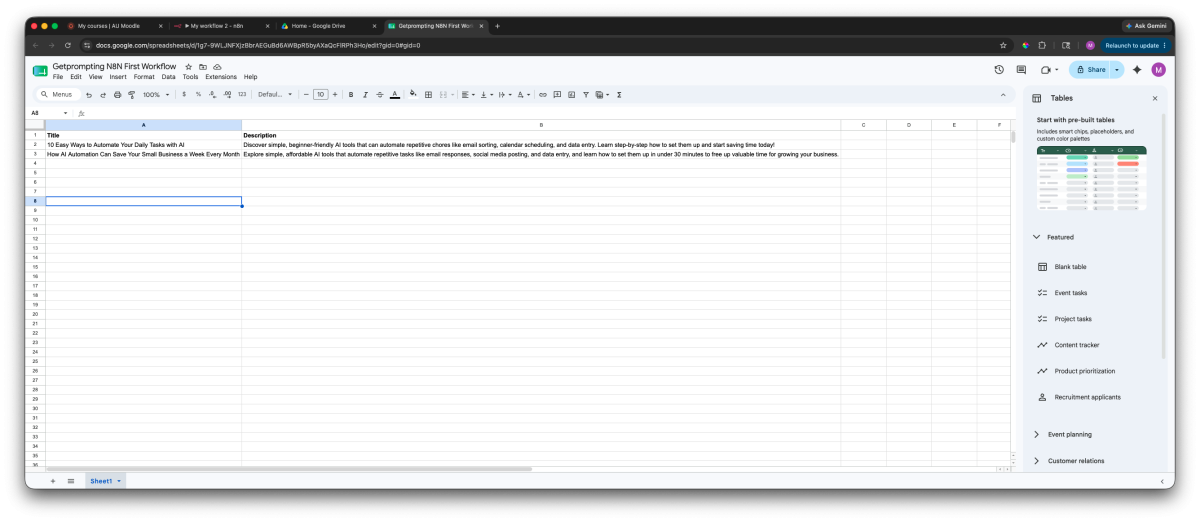
For this example, I used a local Ollama model and a simple Google Sheet with two columns:
Title | Description
You can expand this later with categories, dates, tags, workflow names, or anything else you want to track.
A Quick Note About Connecting Apps in n8n
One of the biggest beginner lessons with n8n is this:
You do not need to memorize every integration.
Instead, learn how to find the right node, the right documentation, and the right credential setup process.
For example, if you want to connect Google Sheets to n8n, a good search is:
n8n Google Sheets node documentation
Or:
n8n Google Sheets credentials setup
If you are connecting another tool later, swap the tool name:
n8n [tool name] API documentation
n8n [tool name] credentials setup
n8n [tool name] OAuth setup
You can also use AI to help you figure out where to start. A simple prompt like this works well:
I am building an n8n workflow.

I want to connect:
[Tool A] → [Tool B]

Help me find:
- the correct n8n nodes
- what credentials I need
- what official documentation matters
- common setup mistakes
- how to test the connection

Assume I am a beginner.
This is one of the most useful workflow-building habits you can develop. Do not just ask AI to build the whole automation blindly. Ask it to help you find the right setup path, then verify the steps against the official docs.
Why This Workflow Uses Ollama and Google Sheets
I chose Ollama and Google Sheets because they make the workflow easy to understand.
Ollama lets us run a local AI model on our own machine. Google Sheets gives us a simple place to store the result without setting up a full database.
Later, this same workflow pattern could send data to:
- A database
- A Notion workspace
- An email draft
- A content calendar
- A customer relationship management tool
- A larger AI workflow system
For now, we are keeping it simple enough to build, test, and understand in one sitting.
Step 1: Create Your Google Sheet
Before building the workflow inside n8n, let’s create the place where our AI-generated content will be saved.
Open Google Sheets and create a new spreadsheet.
For this example, I created two simple columns:
Title | Description
The goal here is not to design the perfect database. We just need somewhere simple to prove our workflow works.

Once the workflow runs successfully, n8n will automatically create new rows using the response from our local AI model.
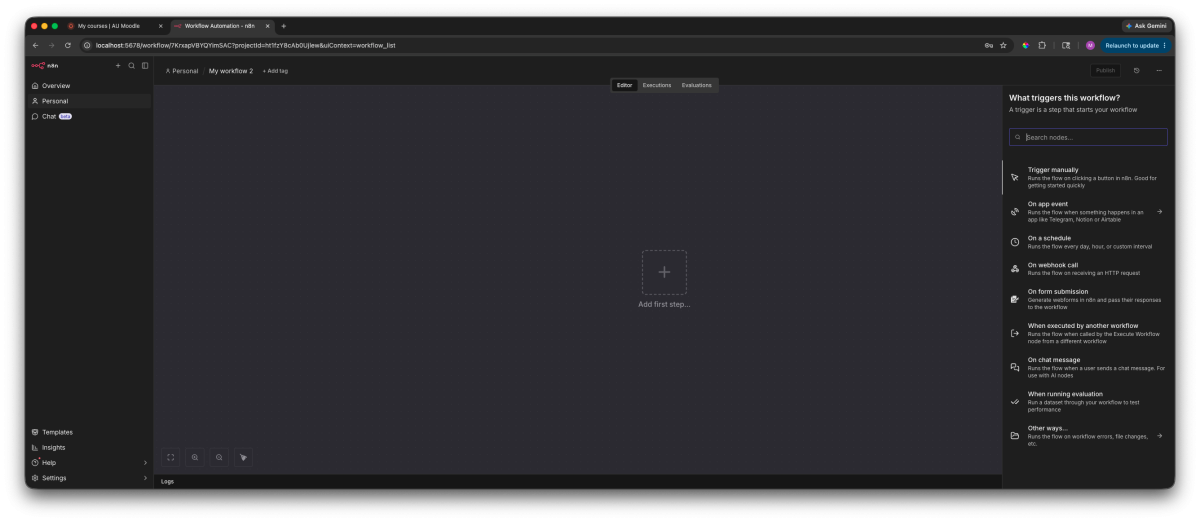
Step 2: Create a New Workflow in n8n
Open your n8n instance and create a new blank workflow.
Every n8n workflow starts with a trigger. The trigger decides when your automation should begin.
Examples of triggers include:
- A button click
- A schedule
- A form submission
- A webhook from another application
- A new file or message appearing somewhere
Since we are learning, we are starting with the simplest option: a manual trigger.
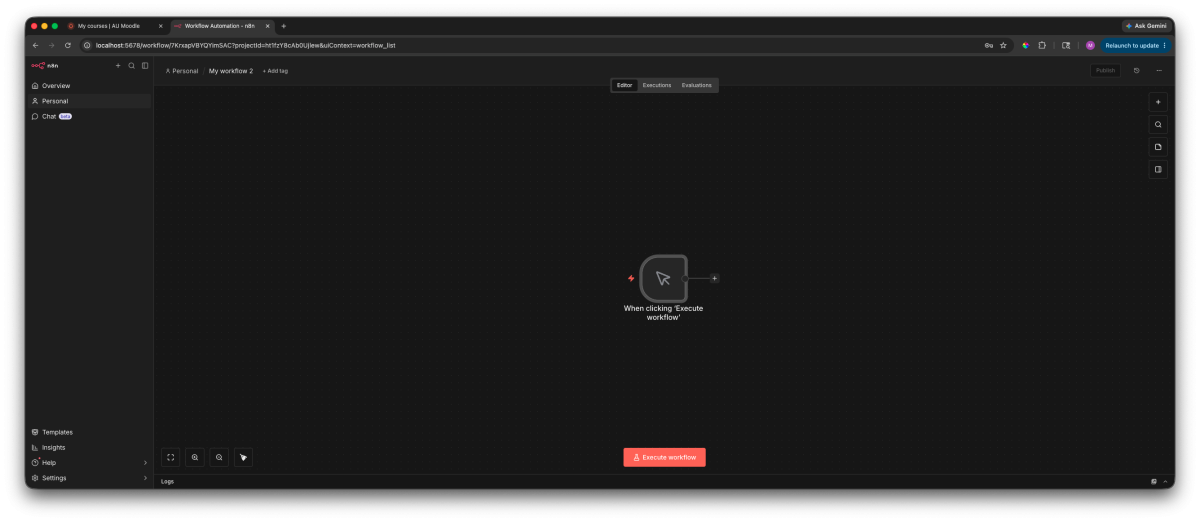
Step 3: Add a Manual Trigger Node
Add the Manual Trigger node to your workflow.
This gives us a button we can press whenever we want to test the automation.
Later, this same workflow could be changed to run automatically using a schedule, webhook, or another app trigger.
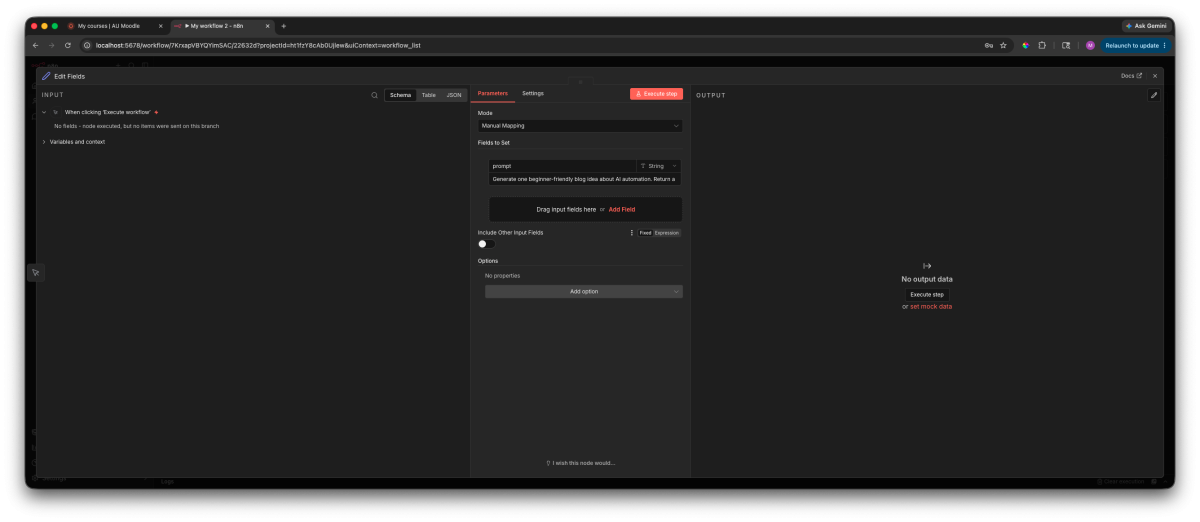
Step 4: Create Your AI Prompt With an Edit Fields Node
Next, we need to give our AI model something to work with.
Add an Edit Fields node after the manual trigger.
In n8n, nodes pass information from one step to the next. The Edit Fields node lets us manually create or change pieces of data inside our workflow before sending them somewhere else.
Think of it like creating a variable or filling out a form. We are creating a field called prompt, adding our instructions, and then passing that prompt into the AI model.
Inside the Edit Fields node:
- Create a new field named prompt
- Set the type to String
- Enter the instructions you want your AI model to follow
For this example, I created a simple prompt asking the AI model to generate beginner-friendly blog ideas.
This is where workflows start becoming powerful. The prompt does not have to be hardcoded forever. Later, this information could come from a form submission, spreadsheet, website, email, or another application.
You could replace this prompt with instructions like:
- Summarize meeting notes
- Create content ideas
- Analyze customer feedback
- Generate task lists
- Rewrite information into another format
The important concept is understanding the pattern: create data, send it to another node, then let the workflow continue processing it.
Each node receives data, does something with that data, then passes the result forward.
Every n8n node has its own settings, options, and configuration steps depending on what you are trying to connect. Some nodes only need a few fields filled out, while others require accounts, API keys, or authentication settings.
If you ever get stuck setting up a specific node, the best place to start is the official n8n node documentation. You can search for the node you are using and find examples, available settings, and connection instructions.
Step 5: Connect n8n to Ollama
Now we can send our prompt to a local AI model.
Add the Ollama node and connect it after your prompt step.
Because Ollama is running locally, n8n needs to know where to find it.
If n8n is running inside Docker, you may need to use:
http://host.docker.internal:11434This tells your Docker container how to reach services running on your computer.
Select your Ollama model and map your prompt field into the message input.

When you test this step, you should see a response generated from your local AI model.
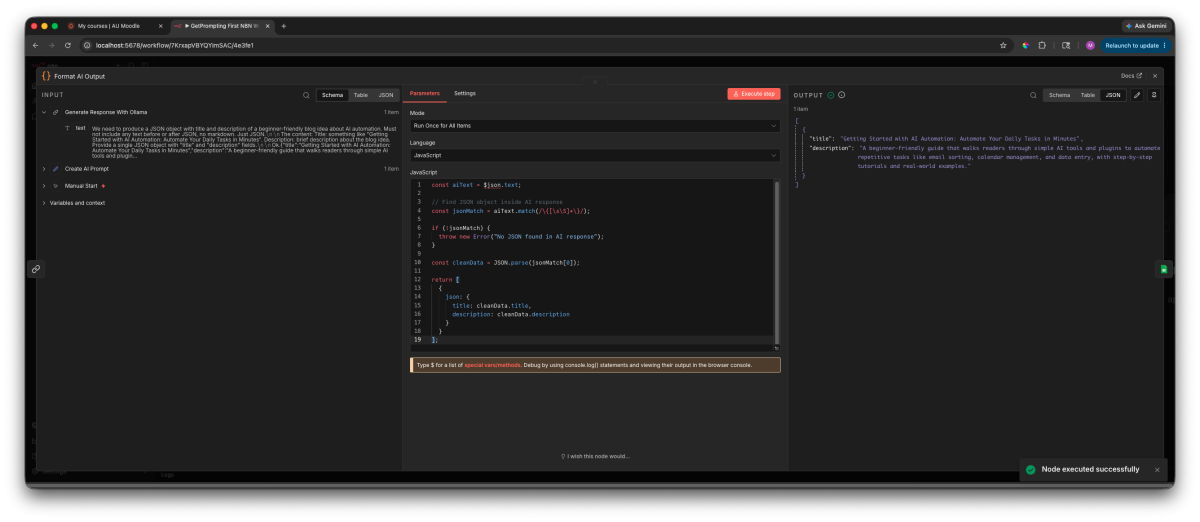
Step 6: Format the AI Response
At this point, our workflow can send a prompt to Ollama and receive an AI-generated response.
However, there is one small problem.
AI models are great at creating information, but other tools usually expect information to follow a specific structure.
This is where many AI workflows need a cleanup step.
For this workflow, I used a small JavaScript step to clean up the AI response before sending it to Google Sheets.
Not every n8n workflow needs code. Many workflows can be built with visual nodes only. But sometimes a small code step is useful when you need to clean, extract, or reshape data before passing it to the next tool.
const aiText = $json.text;

// Find JSON object inside AI response
const jsonMatch = aiText.match(/{[sS]*}/);

if (!jsonMatch) {
  throw new Error("No JSON found in AI response");
}

const cleanData = JSON.parse(jsonMatch[0]);

return [
  {
    json: {
      title: cleanData.title,
      description: cleanData.description
    }
  }
];
This code looks for a JSON object inside the AI response, turns that JSON into usable data, and then returns two clean fields: title and description.
If you are not comfortable writing JavaScript, this is a great place to use AI as a helper. Instead of asking AI to build the entire workflow blindly, ask it for one small transformation at a time.
For example, you could ask:
I am using an n8n Code node.

My previous node returns this field:
$json.text

The text should contain a JSON object with:
- title
- description

Write JavaScript for the n8n Code node that:
- finds the JSON object
- parses it
- returns title and description as clean output fields
- includes a helpful error if no JSON is found
The key is to keep the request small and specific. AI is much more useful when you ask it to help with one clear transformation instead of asking it to magically understand your whole workflow.
This pattern appears constantly when building automations:
Messy Input
      ↓
Process Information
      ↓
Clean Output
The tool you save information into usually matters less than learning how information moves through the workflow.
Step 7: Save the AI Response to Google Sheets
Now that our AI response is formatted, we can save it somewhere useful.
Add a Google Sheets node to the end of your workflow.
For the action, choose to append a new row.
This allows every workflow run to create a new entry instead of replacing old results.
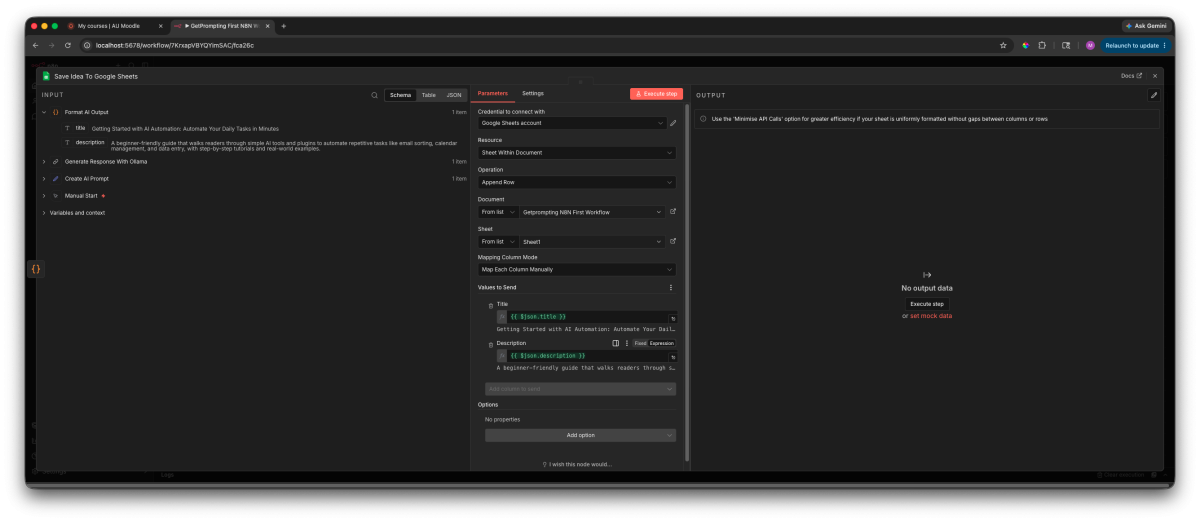
Connecting Your Google Account
The first time you use Google Sheets inside n8n, you will need to connect your Google account by creating credentials.
Open your Google Sheets node and look for the Credential to connect with section. Select Create new credential and n8n will walk you through the required connection steps.
For most beginners, this just means signing into Google, approving the connection, and coming back to n8n once the account is linked.
One helpful feature beginners often miss is that every n8n node includes direct access to its documentation.
If you get stuck configuring a node, click the Docs link in the node panel. This opens the official documentation for that specific integration, including available options, examples, and authentication requirements.
Every integration is slightly different, but the general process usually follows the same pattern:
- Create or connect credentials
- Authorize the application
- Select the resource you want to use
- Configure the node settings
- Run a test execution
Learning where to find the documentation is more valuable than memorizing one setup process because the same approach works whether you are connecting Google Sheets, Notion, Slack, databases, or other APIs.
Step 8: Run Your Finished n8n AI Workflow
Now it is time to test everything together.
Click execute workflow and watch the data move through each step.
Once the happy path works, the next improvement is deciding what should happen when the output is incomplete or uncertain. This human-in-the-loop workflow pattern adds clear stop conditions, safe retry rules, and a readable review handoff without turning the beginner build into one giant automation.
Your workflow should now:
- Create the starting prompt
- Send the request to Ollama
- Generate an AI response locally
- Format the output
- Add a new row in Google Sheets
Congratulations, you just built a complete AI workflow.
It may be simple, but the structure is very similar to much larger automation systems.
What Can You Build After This?
If you want more examples to import and study, the Free n8n Workflow Library collects the next set of beginner-friendly builds in one place.
This workflow is only the beginning.
Once you understand this pattern, you can replace almost any part of it.
Different Trigger
        ↓
Different AI Model
        ↓
Different Output Tool
The same idea could become:
- An AI research assistant
- A meeting notes summarizer
- A content planning workflow
- A customer feedback analyzer
- A personal productivity assistant
If you want to continue experimenting with local AI workflows, these guides are good next steps:
- What Is RAG? Retrieval Augmented Generation Explained Simply
- Build a Local AI Memory Assistant With AnythingLLM and Ollama
- Local AI for Beginners: Run AI on Your Own Computer
Frequently Asked Questions
Can n8n connect to local AI models?
Yes. n8n can connect to local AI tools like Ollama, allowing you to build AI workflows that run on your own computer instead of only relying on cloud AI services.
Do I need programming experience to build n8n workflows?
No. Many n8n workflows can be built visually. Some advanced workflows may use small code steps, but you can build many useful automations without becoming a developer.
Can I replace Ollama with ChatGPT or another AI model?
Yes. The same workflow pattern can work with other AI providers. The nodes and credentials may change, but the basic structure stays similar.
Start small, build something useful, and improve your workflow one piece at a time.
Stay curious, keep experimenting, and as always…
Stay sharp,
Free AI Workflow Starter Kit
Turn what you learned into something useful.
Get the workflow canvas, assistant planner, reusable prompt templates, and first n8n walkthrough, plus practical guides as GetPrompting grows.